Saturday 28 July 2018

July Junque Journal Summer Camp Challenge Week 3 | Vicki Boutin

Hi everyone!

I have some new Junque Journal pages to share with you today that I’ve created for Vicki Boutin’s Junque Journal Summer Camp challenge. I used some of the prompts from week 3 of July to inspire my pages. I had so much fun creating them! 

Prompt #16 Brushstrokes 

The first page I created was for the brushstrokes prompt… 


To create the background for this page, I chose four different colours of the Color Pop acrylic paints, I watered them down just a little bit, and then I used the widest of the VB paint brushes to add stripes of paint to the page. 


I had some excess paint left on my craft mat after I finished painting the background, so I decided to stamp some flowers using black archival ink, and I used the leftover paint to paint the flowers. I also stamped some leaves and fussy cut these as well. 


Once everything was dry, I arranged the flowers on the painted background, matching up the colour of each flower to the painted stripes. I love how bright and summery this looks, and I definitely want to try out this design on a scrapbook layout! 


To finish the page off, I added a die cut from the ‘All the Good Things’ collection, which I adhered with foam tape for added dimension. 


Prompt #17 Art Crayons & Iridescent Glaze 

The second page that I created was inspired by prompt #17… 


I started this page off by creating a watercolour effect on the background using pink, orange and red art crayons. I applied the art crayons using the packaging / kissing technique, and then used my waterbrush to blend the colour and move it around on the page. Next I added some stamping using a couple of the circle stamps, and the same colour art crayons that I had already used. For the final layer on the background, I mixed the pink and red art crayons with the iridescent glaze and applied it through the script stencil. 


I love the shimmer and texture that the Iridescent glaze adds to the page, and also that you can customise it to whatever colour you like using your art crayons! 


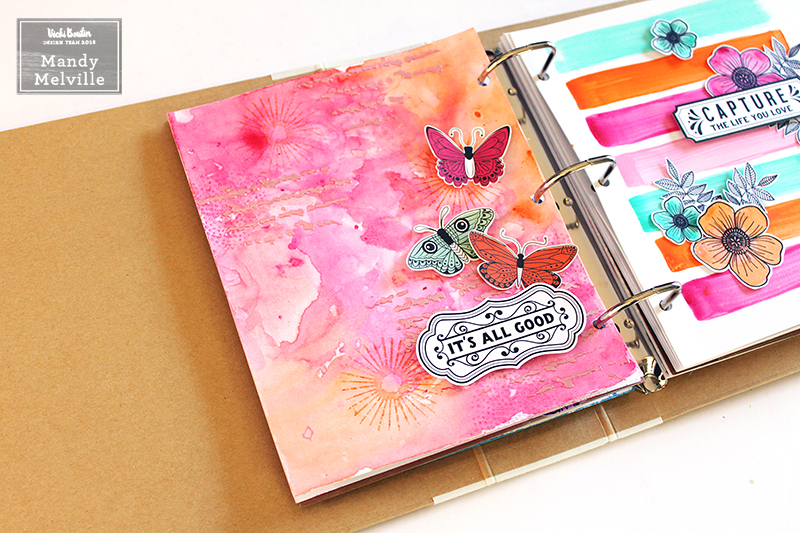
I embellished this page with a few fussy cut butterflies and a sticker from the watercolor sticker pack. Once again, I used foam tape to adhere the embellishments to give them lots of dimension. 


Prompt #19 Gesso Resist 

For my final Junque Journal page this week, I created a background using the gesso resist technique… 


To start this page off, I applied some gesso through the flower stencil using a palette knife. 


Once the gesso was dry, I added some watercolour over the top using art crayons with plastic packaging. I mixed together the light blue art crayon with the lime green one to create a pretty aqua colour. I also added some splatters to the page using a paint brush. 


I waited for everything to dry, and then I used a baby wipe to buff the areas where I had added the gesso through the stencil. Because the gesso resists the art crayons, it was easy to remove the colour from those stencilled areas, and it allowed that stencilling to really show through. 


To finish the page off, I created a little cluster using embellishments from the ‘All the Good Things’ collection. 


That’s it for this week! I hope that you enjoyed taking a look at my Junque Journal pages! I have a process video which shows how I created the first two pages, if you’d like to check it out… 


Thanks so much for joining me today! 

Supplies Used: 
Junque Journal 
Junque Journal Refills – White Paper 
Gesso 
Color Pop Acrylic Paint – Set 1 
Color Pop Acrylic Paint – Set 3 
Art Crayons #1 – Warm 
Art Crayons #2 – Cool 
Creative FX Glaze – Iridescent 
Stamps & Dies – Set 2 
Stamp & Dies – Set 3 
Stencils 
Watercolor Brushes 
Mister Bottles 
Cardstock Die-Cuts – Icons 
Cardstock Die-Cuts – Frames 
Watercolor Stickers 
Double-sided Patterned Paper – Social Butterfly 


Thursday 19 July 2018

July Junque Journal Summer Camp Challenge Week 2 | Vicki Boutin

Hey friends!

Today I want to share with you what I’ve been creating in my Junque Journal this week. I’ve been playing along with Vicki Boutin's July Summer Camp prompts, and I love that these give me a quick jumping off point for my junque journal pages! 

Lately I’ve been creating mini scrapbook pages in my junque journal, and I’ve really enjoyed doing that, but this week I started working in a new journal, and this one is going to be just for playing and experimenting with my mixed media products… No photos. So it will be more like an art journal, than a mini album. Here’s a look at the three pages that I created this week… 


I had so much fun creating these pages, and I love how they tuned out! Let’s take a closer look at them, and I’ll show you how I created each one… 

Prompt #9 Monochromatic 

To start this page, I painted the whole background with the Cotton Candy acrylic paint. I used a baby wipe to apply it. 


Next I applied some gesso through the flower stencil using an ink blending tool. I also watered down some gesso and splattered it onto the background with a paint brush. 


Once that layer was dry, I repeated this process, but this time I used the Sugared Strawberry acrylic paint through the butterfly stencil. 


For the final layer, I added some stamping using one of the circle stamps and the bright pink ink from the Color Wheel. 


Here’s a look at the completed page… 


I finished the page off with a stamped sentiment using one of the ‘All the Good Things’ stamp sets. 


Prompt #13 Punch it Out 

I started this page off by creating a pretty watercolour effect on one of the Junque Journal inserts, using pink, purple and blue art crayons. I added the colour to the page using the packaging / kissing technique, and then used my waterbrush to blend the colour and move it around on the page. 


Next I used my stencil brush to apply the art crayons through the circle stencil. Because I knew that I was going to be punching shapes out of this background, I wanted to create lots of interest and varying depths of colour on the page. 


Once I was finished with the background, I used one of my VB stamp sets to stamp lots of flowers onto the page in different sizes. I then used the dies in the set to cut the flowers out. (This counts as punching right?!) 


I decided on using one of the Kraft inserts for this page, as I thought the flowers would look pretty against the Kraft. I wanted to create a hazy white background behind the flowers so I used my stencil brush to apply some gesso to the page. I then arranged the flowers, cascading down the right hand side of the page. Here’s a look at the finished page… 


I added some foam tape underneath some of the flowers to give them some extra dimension. Once again, I finished the page off by adding a stamped sentiment using a stamp from my stash. 


Prompt #14 Plastic Cups / Found Objects 

I was on a roll, so I created one more quick page for the ‘found objects’ prompt… 


As with the first page, I applied acrylic paint to my background using a baby wipe. I then built up the layers on the background by applying gesso through a stencil, as well as stamping in various cool colours using the circle stamps. My found object was a small medicine cup, which I used to stamp the black circles onto my page. The final layer is what really gives this page a ‘wow’ factor… I applied some gold glaze through a small circle stencil from my stash to three areas on the background. I LOVE how this looks! 


As with my previous two pages, I added a stamped phrase, as this just gives the page a focal point. 


I really love how that gold glaze shines in the light! 


That’s it for this week! I hope that you enjoyed taking a look at my Junque Journal pages! I have a process video which shows how I created the first two pages, if you’d like to check it out… 


Thanks so much for joining me today! 

Supplies Used: 
Junque Journal 
Junque Journal Refills – White Paper 
Junque Journal Refills – Kraft Paper 
Gesso 
Color Pop Acrylic Paint – Set 1 
Color Pop Acrylic Paint – Set 2 
Color Pop Acrylic Paint – Set 3 
Art Crayons #1 – Warm 
Art Crayons #2 – Cool 
Color Wheel Pigment Ink – Cool Tones 
Color Wheel Pigment Ink – Warm Tones 
Creative FX Glaze – Gold 
Stamps & Dies – Set 2 
Stamp & Dies – Set 3 
Stencils 
Watercolor Brushes 
Stencil Brush Set 
Mister Bottles 


Tuesday 17 July 2018

Good Life | Vicki Boutin

Hey friends!

Today I'm sharing a new layout for the Vicki Boutin design team, featuring some fun and easy mixed media techniques! On this layout, I documented a beautiful photo of my eldest daughter Abigail, with my Mum, taken on her birthday last year. I decided on using the pinks and aquas from the ‘All the Good Things’ collection, to complement the photo. 

Here’s a look at my finished layout… 


This is how I created my background… 

I started off with a sheet of the Vicki Boutin Foundations Paper, and I added some acrylic paint on my background to the area where I wanted to add my photo. I used the Coral Macaroon Color Pop paint, and I applied it using a dry brush. 


Next I used one of the Vicki Boutin stencils and I applied some Iridescent glaze through it using a palette knife. I masked off the outer flowers on the stencil, as I only wanted to use the centre flower. I repeated the design three times over the top of the painted area. 


For my next layer, I added some stamping using the script stamp and the bright pink ink from the warm color wheel. 


And to finish off my mixed media background, I added some splatters using watered down acrylic paint 


It was fun to build up lots of layers on my background, and I love the colour and texture that it adds to the page! 

I matted my photo with the Pretty Words patterned paper, and added some craft foam underneath it to give it some extra dimension. On the left hand side of the photo, I created a little floral cluster that includes a stamped flower, and a couple of die cut leaves. 


I created my title using a combination of the chipboard and foam Thickers from the collection. I love mixing different fonts to create my titles, as it adds lots of interest! 


I fussy cut a couple of the bright pink butterflies out of the Social Butterfly patterned paper, and used them to embellish my page. I also added one of the cardstock word stickers at the top of the page. Rather than leaving it as a long strip, I decided to cut it in half to create two shorter strips that I layered together. I finished the page off with some stamped leaves to add some extra detail. 


Thanks so much for joining me here today! I hope that you enjoyed taking a look at my layout! I’ll be back next week to share some more inspiration with you! 

Supplies Used: 
Foundations Paper 
Color Pop Acrylic Paint – Set 3 
Creative FX Glaze – Iridescent 
Color Wheel Pigment Inks – Warm Tones 
Stencils 
Stamps & Dies – Set 1 
Stamps & Dies – Set 2 
Brushes 
Cardstock Stickers 
Thickers – Alpha/B&W Chipboard 
Thickers – Phrase/Glitter Foam 
Cardstock Die Cuts – Icons 
Double-sided Patterned Paper – Pretty Words 
Double-sided Patterned Paper – Social Butterfly 


Sunday 15 July 2018

Beautiful | Cocoa Vanilla

Hi everyone!

Today I have a new layout to share with you featuring the gorgeous Cocoa Vanilla Bohemian Dream collection! I documented a cute photo of my youngest daughter Eleanor wearing a sweet unicorn headband that her sister bought for her. I just love the cute expression on her face! With lots of blues in the photo, Bohemian Dream was perfect for scrapbooking this photo!


I decided on using a large background cut file for this layout, and I backed each of the flowers in the cut file with one of the blue patterned papers from the collection. The papers that I used were...

Abundant (reverse side)
Beautiful Mess (reverse side)
Flower Child (reverse side)
Gypsy Heart (reverse side)
Wild & Free (reverse side)

Once I'd finished backing the cut file, I cut it down the middle, and positioned each piece so that the straight edge was up against the left and right hand sides of the page.


Next I matted my photo with the Abundant patterned paper, and I tucked it in between the two pieces of the cut file. I also tucked a die cut frame under the bottom right hand corner of the photo, and added the die cut piece that says 'Wild Child' across the bottom of the photo.


I had originally planned for this to be a monochromatic layout and to only use shades of blue, but I decided to bring some purple into my embellishing, and I love how this looks! The little chipboard bird that I added to the left of the photo is so cute!


I used one of the pretty chipboard words from the collection as the title for my page. I really like how the white title looks against the white background.


I finished the layout off with a few of the little word stickers and some enamel dots.


Thanks so much for joining me here today! I hope that you enjoyed taking a look at my layout. I'll be back next month with some more inspiration to share with you. Until then, take care.

Mandy x

Sunday 8 July 2018

Junque Journal Pages | Vicki Boutin

Hi everyone!

Today I have two new junque journal pages to share with you! Have you started on your July prompts for Vicki Boutin's Junque Journal Summer Camp challenge? Last month we covered the basics, and this month we’re going to take it a step further! It’s going to be fun, so make sure you play along with us! 

For my first page, I thought I’d start with prompt #1 for July, which is to use layered stamps! Here’s a look at my page… 


This was such a quick and easy background to create, and I love how it turned out! I used the Vicki Boutin circle stamps, and started by stamping multiple circle designs onto my background using black archival ink. I then chose three different colours of ink from the Color Wheels, and using the solid circle stamps, I stamped over the top of the patterned black ones. And that was it! Super easy, and the result is so fun! 


This page was perfect for documenting a photo of my son swimming in the pool at my parent’s house last summer. The bright colours on the background really helped my photo to pop! I also added some craft foam underneath the photo to give it some extra dimension, and matted it with the Pretty Words patterned paper. 


I added a title at the top of the page using a die cut from the ‘All the Good Things’ collection, and wrote my journaling underneath the title. I finished the page off with some little watercolor stickers, and black enamel dots. 


For my next page, I was inspired by prompt #4, which is to create an ombre effect. Here’s a look at my page… 


This is how I created the background… 

1) First I applied some matte acrylic gel medium through the circle stencil using a palette knife. This was just to add some texture to the page, before I added the colour.

2) Once that was dry, I used the ‘kissing’ technique to apply my art crayons. I chose colours that I knew would shade into one another to create an ombre effect. I started at the bottom of the page with the blue, and then blended that into the teal green, and then finally the yellow at the top of the page. 

I totally LOVE these colours, and the ombre effect on the background! 


Next I chose three inks that matched the colours on the background, and stamped a circle design onto white cardstock in each of the colours. Then, using the dies that come with the stamps, I die cut the circles and arranged them on my page, matching them to the colours on the background. I also added an enamel dot of the same colour in the middle of each circle. For my title, I combined one of the gold glitter words from the foam Thickers pack, with the Vicki Boutin chipboard Thickers. 


On this page, I documented a photo of my youngest daughter playing at the playground. Once again, I matted my photo with the Pretty Words patterned paper, and added some craft foam underneath it for some extra dimension. Under the left hand side of the photo, I tucked some die cut leaves. 


Lastly, I added a yellow die cut flower at the top of the page, and I also added some journaling to the left of the photo. 


Thanks so much for joining me here today! I hope that you've been inspired!

Supplies Used: 
Junque Journal 
Junque Journal Refills – White Paper 
Gesso 
Matte Acrylic Gel 
Art Crayons #1 – Warm 
Art Crayons #2 – Cool 
Color Wheel Pigment Ink – Cool Tones 
Color Wheel Pigment Ink – Warm Tones 
Stamps & Dies – Set 3 
Stencils 
Watercolor Brushes 
Thickers – Alpha/B&W Chipboard 
Thickers – Phrase/Glitter Foam 
Cardstock Die-Cuts – Icons 
Cardstock Die-Cuts – Frames 
Self-Adhesive Finishing Embellishments 
Watercolor Stickers 
Double-sided Patterned Paper – Pretty Words