Wednesday 27 June 2018

Selfies | Junque Journal | Vicki Boutin

Hi friends!

Today I'm sharing a new entry in my Vicki Boutin Junque Journal! Are you playing along with Vicki’s Junque Journal Summer Camp challenge? It’s so much fun, and I’m loving being able to play and experiment with all of my Vicki Boutin mixed media goodies in my junque journal! I’m using my journal as a mini album to document photos from last Summer (which is providing a nice distraction from the very cold weather that we’re having here in Australia at the moment!). 

I’ve combined quite a few of the June prompts on these pages, and created a few layers on my background. But don’t feel intimidated if you’re just getting started with mixed media… Keep it simple and just do one prompt at a time. Then once you feel comfortable with each one, then you can start using them together to build up layers. 

So the prompts that I used on these pages were… 

#7 Copycat – I loved the colours that Nathalie used on one of her pages that she shared last week, and so I used this as inspiration for the colours that I used on these pages. 

#10 Matte Gel Medium – I applied the Matte Gel Medium through a stencil. 

#16 Mix It – I mixed my art crayons to create new colours. 

#19 Stencil 

#20 Stamps 

#21 Layers 

#25 Kiss It – I applied my art crayons using the ‘kissing’ technique 

Here are the pages that I created… 


 Here’s how I created my background… 

First I taped the two pages together with washi tape at the back, and then I applied a thin coat of gesso to the background to prime it for the wet mediums. 

· Next I applied the matte gel medium through the circle stencil using a palette knife. I didn’t apply it to my whole background, just to various areas, so that it would create some texture and interest. 


Once the matte gel medium was dry, I applied the art crayons using the ‘kissing’ technique. To do this, you simply scribble the art crayons onto some plastic packaging, or a sheet of acetate, and then using your water brush add a little water and mix the pigment with the water to create a watercolour. To apply it to your page, you just gently ‘kiss’ the packaging to your cardstock. I also used my water brush to move the colour around a little on the background. Because I was using both warm and cool colours on this page, I made sure that the warm colours were completely dry before applying the cool colours. That way I avoided making ‘muddy’ colours when they mix together. 


For the final layer on my background, I added some stamping using the Vicki Boutin circle stamps with the Color Wheel pigment inks. I wanted a tone-on-tone look, so I stamped using the same colours that I’d already used on my background with the art crayons. 


And that was it for the background! It was really just three layers of mixed media to create a fun, colourful and textured background! It’s easy once you know how to do each of those layers! 

So once I was done with the background, I was ready to add my photos and start embellishing! I decided on documenting two fun selfies of me with my three kids on this page, as I thought the colourful background would really complement them! I added them to the left hand page, and I adhered the bottom one using craft foam to give it some extra dimension. 


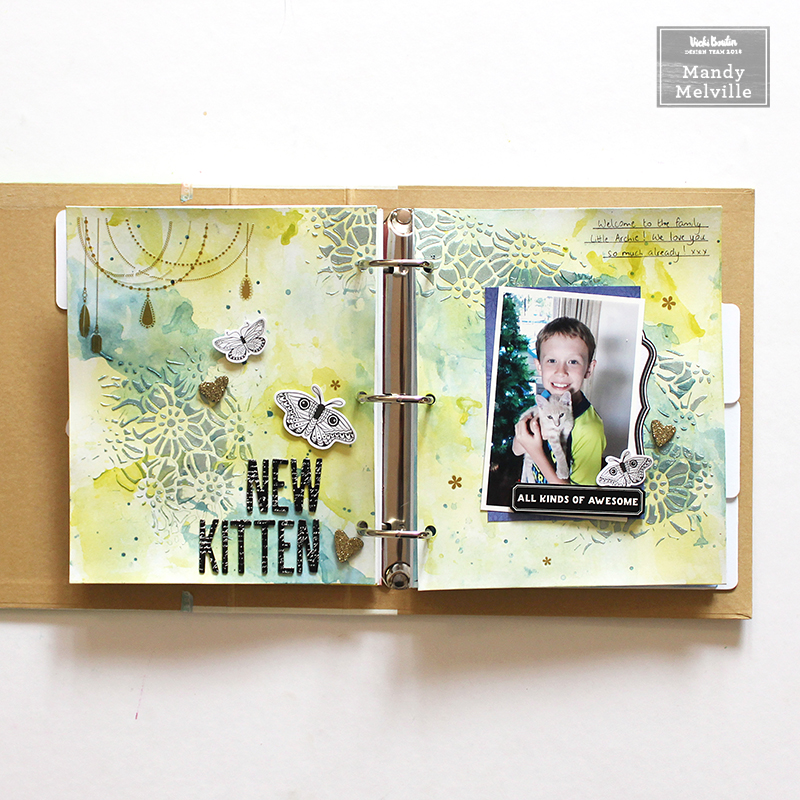
I fussy cut some of the gorgeous butterflies out of the ‘Social Butterfly’ patterned paper to use on my pages. I added one to the left of the top photo, just adding glue to the centre of the butterfly so that the wings would lift off the page. I then added my title at the top of the page, using the Vicki Boutin chipboard Thickers. 


Here’s a closer look at the right hand page, where you can see all of that gorgeous colour and texture on the background. 


I added my journaling to this page, using one of the journaling tags from the ‘All the Good Things’ die cut frames pack. I also layered a cardstock sticker across the bottom of it, and tucked a fussy-cut butterfly under the sticker to create a little cluster. 


I finished the page off with a couple more butterflies, and some enamel dots. 


Thanks so much for joining me today! I hope you enjoyed taking a closer look at my pages. If you’d like to watch how I created them you can check out my process video over on my YouTube channel… 


Supplies Used:
Junque Journal 
Junque Journal Refills – White Paper 
Gesso 
Acrylic Gel - Matte 
Art Crayons #1 – Warm 
Art Crayons #2 – Cool 
Color Wheel Pigment Inks – Cool Tones 
Color Wheel Pigment Inks – Warm Tones 
Stencils 
Stamp & Dies – Set 3 
Watercolor Brushes 
Cardstock Stickers 
Self-Adhesive Finishing Embellishments 
Thickers – Alpha/B&W Chipboard 
Cardstock Die-Cuts – Frames 
Double-sided patterned paper – Social Butterfly 


Monday 25 June 2018

Junque Journal pages | Vicki Boutin

Hey everyone! 

Today I have two new pages in my Vicki Boutin junque journal to share with you! I’m loving playing along with the June prompts for Vicki’s Junque Journal Summer Camp! I decided to combine a few of the prompts on each page because I know that I won’t have the time to be able to get messy every day of the month. That’s the fun about this though – You can make it work for you! The important thing is that you’re having fun with mixed media and learning some new techniques along the way! 

So for my first page, I’ve used the cool art crayon pack (prompt #4), along with the Iridescent glaze (prompt #8), and I used the watercolour kissing technique to apply the crayons (prompt #25)! Here’s a look at my finished page… 


 And here’s my process for creating the background for this page… 

First I scribbled the art crayon onto some plastic packaging, added a little water, and then applied the watercolour to my cardstock using the ‘kissing’/packaging technique. I also used a waterbrush to move the colour around on the page, and to blend the colours. 


Once that was dry, I added some stencilling using the art crayons and a stencil brush. 


Next I decided to use the Iridescent glaze with the circle stamps. I wanted to create the look of bubbles to tie in with the photo that I was documenting. I simply put a little bit of the glaze onto my craft mat, spritzed some water onto it to dilute it, and then stamped into the glaze then onto my page. It doesn’t give a perfect image, but that was the look I was going for! I also added some splatters using the glaze. 


Lastly I added some stamping using another one of the circle stamps with and an ink from the cool color wheel. Here’s a look at the completed background… 


As I mentioned, I wanted to document a photo of my youngest daughter playing with bubbles on this page, so I decided to use lots of circular elements, both on the background and in my embellishing. 


I matted my photo with one of the patterned papers from the ‘All the Good Things’ collection, and then I also tucked a frame and a circle die cut behind the photo as well. 


I added my title using the fabulous Vicki Boutin chipboard Thickers. I also used a few of the watercolor stickers on this page, and I adhered them using foam tape to give them some extra dimension. I finished the page off with some stamped hearts, and black enamel dots. 


For my next page, I was inspired by prompt #13, which was to use either gesso or matte gel medium as a resist, as well as prompt #11, which was to blend using the stencil brush. These techniques were really fun, and I love how this turned out! Here’s a look at my page… 


This is how I created the background… 

· First I applied gesso, using a palette knife, through the Vicki Boutin butterfly stencil 


Once that was dry, I used my stencil brush to apply three different colours of art crayons to the entire background. I then took a baby wipe and simple wiped clean the areas where I had applied the gesso through the stencil. Because the gesso resists the art crayons, the colour wipes off easily, bring it back to white again. 


Next I used the smaller stencil brush, along with the script stencil, to apply some stencilling just to the blue areas on the background. I wanted it to have a tone-on-tone look, so I chose a darker blue than what I had used on the background. 


Lastly I watered down the purple art crayon, and used a small paint brush to add some splatters to the background. 


I documented a photo of my eldest daughter with my nephew on this page. I created some layers behind the photo using a patterned paper from the 7x10 inch paper pad, as well as a die cut from the frames pack. Under the left hand side of the photo I tucked some die cut flowers and leaves. I adhered the photo using foam tape, to help it to really pop off the page. 


I added my title, once again using the ‘All the Good Things’ chipboard Thickers, and then I finished the page off with a few black hearts from the foam Thickers pack. 


Thanks so much for joining me here today! 

Supplies Used: 
Junque Journal 
Junque Journal Refills – White Paper 
Gesso 
Art Crayons #1 – Warm 
Art Crayons #2 – Cool 
Creative FX Glaze – Iridescent 
Color Wheel Pigment Ink – Cool Tones 
Stamps & Dies – Set 1 
Stamps & Dies – Set 3 
Stencils 
Watercolor Brushes 
Stencil Brush Set 
Mister Bottles 
Single-sided Card Pad 7”x10” 
Cardstock Stickers 
Thickers – Alpha/B&W Chipboard 
Thickers – Phrase/Glitter Foam 
Cardstock Die-Cuts – Icons 
Cardstock Die-Cuts – Frames 
Watercolor Stickers 
Double-sided Patterned Paper – Soul Food 


Friday 15 June 2018

You are Awesome, Kid | TN Layout | Cocoa Vanilla Studio

Hey friends!

Today I have a new project to share with you using the amazing Cocoa Vanilla Studio Boys Rule collection! This time I created a traveler's notebook layout, featuring a photo of my son, Isaac, at his school swimming carnival earlier this year. I wanted to document how proud I was of him and the effort that he put in on the day!


I started the layout off by covering both pages with the Expressionist patterned paper. I trimmed the patterned paper slightly smaller than the page, so that it left a white border around the layout to frame it. I then positioned my photo so that it went across both pages.


I love that there are two packs of Ephemera in this collection! I had fun layering bits and pieces from both packs down the right hand page.


I also cut the 'You are Awesome' piece out of the Boy Stuff patterned paper, and I layered this with the die cuts. It made the perfect title for my layout!

To finish the layout off, I added my typed journaling to the left hand page.


I had so much creating this traveler's notebook layout using Boys Rule! I can't wait to create another project with this fun collection!

Thanks so much for joining me here today!

Mandy x

Tuesday 12 June 2018

New Kitten | Junque Journal pages | Vicki Boutin

Hi friends! 

Today I'm sharing a new entry in my Vicki Boutin junque journal! I’m so excited to be joining in with Vicki’s Junque Journal Summer Camp, and I used one of the June prompts to inspire this page. I chose prompt #6, which is to use the neutral art crayon pack. I must admit that this is probably my least used pack of art crayons, but you know what?! I loved playing with these colours, and I’ll definitely be using them more now! I’ll show you my finished pages, and then I’ll take you through my process step-by-step to show you how I created them. 


These junque journal pages were all about experimentation for me… I had no plan when I started, I simply kept adding layer upon layer to my background until I was happy with how it looked! It was fun just to play and experiment with different ways of using the art crayons! 

Here’s my process… 

1) I started by scribbling the green crayon from the pack onto my craft mat, and then spritzing some water onto it to make a watercolour. I then used my brayer to apply it to my background. 


2) Next I added some more colour to the background using the art crayons with a stencil brush. I used the same green again, and I also brought in some grey, and a little bit of the dark blue. 


3) For the next layer, I mixed the Iridescent glaze with the dark blue art crayon, and applied it through one of the Vicki Boutin stencils in three areas on my background. I really love that you can mix the art crayons with the glazes, because it means that you can customise the glazes to whatever colour you want! 


4) Once the glaze was dry, I then applied some more of the dark blue art crayon to the background, this time using the packaging (or kissing) technique. If you haven’t tried this before, all you need to do is scribble the art crayon onto some plastic packaging, add a little water to it, and then ‘kiss’ the packaging to the cardstock to apply the colour. 


5) I also applied some more of the green art crayon using the same technique. 


Here’s a look at the finished pages, before I added my photo and embellishing… 


I started my embellishing by adding my title to the left hand page using the chipboard Thickers from the ‘All the Good Things’ collection. I also added a couple of butterflies from the watercolor sticker pack, and gold glitter hearts from the foam Thickers pack. 


At the top of the page I added a beautiful gold rub-on from the collection. I love how this finishes it off! 


I added a photo of my son with our new little kitten Archie over on the right hand page. I matted the photo with one of the patterned papers from the 7x10 inch paper pad, and I also tucked a label from the die cut frames pack under the right hand side. 


I created a little cluster on the bottom right hand corner of the photo, using a cardstock sticker and another butterfly from the watercolor sticker pack. I also added another gold glitter heart to this page. 


I added a few lines of journaling to the page, and then I was done! Here’ another look at the completed pages… 


Thanks so much for joining me today! I’m looking forward to sharing some more Junque Journal pages with you this month for the Summer camp! Make sure you share your projects with us as well over in the Vicki Boutin Mixed Media Community Facebook group! 

Supplies Used: 
Junque Journal 
Junque Journal Refills – White Paper 
Gesso 
Art Crayons #3 – Neutral 
Creative FX Glaze – Iridescent 
Stencils 
Watercolor Brushes 
Stencil Brush Set 
Mister Bottles 
Single-sided Card Pad 7”x10” 
Cardstock Stickers 
Thickers – Alpha/B&W Chipboard 
Thickers – Phrase/Glitter Foam 
Rub-Ons 
Cardstock Die-Cuts – Frames 
Watercolor Stickers 


Friday 1 June 2018

Awesome | Cocoa Vanilla Studio

Hi everyone!

Today I'm sharing my first layout using the AWESOME new Cocoa Vanilla Boys Rule collection! This just might be my favourite boy collection ever!! I LOVE the colours, and the embellishments are so fun! This layout came together very quickly (well quick for me anyway!), and that's because the product was just so easy to work with! On this layout I documented a photo of my hubby and my boy fishing together while we were on holidays last year...


I decided on using the reverse side of the Star Fall patterned paper as the background for this layout. This kind of paper is perfect for using as a background as the pattern is subtle, but still adds some nice detail to the page. I then layered three more patterned papers onto my background to provide a matt for my photo to sit in. The papers I used were:
Expressionist (both sides)
Fun & Games (reverse side)

I also cut out the strip of stars from the Boy Stuff patterned paper, and tucked it under the bottom edge of the Expressionist patterned paper.


Next I matted my photo with one of the sections from the Fun & Games cut apart sheet, and I adhered my photo using craft foam underneath to give it some extra dimension. To the left of the photo I added an arrow from the die cut ephemera pack, and then I added my title along the bottom of the photo using one of the chipboard pieces. I love that these are now pre-cut, which makes them easier to move around your page whilst deciding on their placement.


To the right of the photo I added a die cut camera, and I also tucked a label from the Miscellany die cut pack under the side of the photo. I typed my journaling on my typewriter and then cut it up into strips to add to the label.


I used the 'adventure' die cut from the miscellany pack, and I tucked it under the top edge of the light blue Expressionist patterned paper. I also added a flair button there as well.


I finished the layout off with some of the chipboard crosses and a few little word stickers from the accessory sticker sheet.

Thanks so much for joining me here on my blog today! I hope that you enjoyed taking a look at my layout and how I used the amazing Boys Rule collection!

Mandy x