Sunday 26 February 2017

Hello | The Cut Shoppe

Hi everyone!

Today I'm sharing a layout that I created using one of the new release cut files from The Cut Shoppe etsy store!


I scrapped a beautiful photo that I took recently of my parents with my three kids. I love documenting the relationship between my kids and their extended family!

I used the lovely Shimelle 'Little by Little' collection for this layout! I love all the pretty colours and patterns throughout the collection!

This is the XOXO cut file that I used to create this page...

The XOXO cut file can be used as individual desings or a full background for your scrapbooking and papercrafting projects.

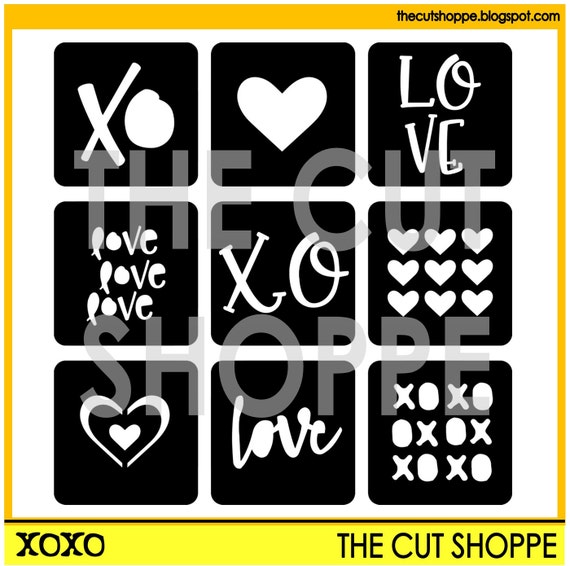
I used the image with the nine hearts and enlarged it to use as the background for my layout. I love how it turned out!


I backed each heart with patterned paper from the 'Little by Little' collection. I added foam dots in between the white cardstock and the patterned papers to give the page some extra depth and interest.


I used stickers and ephemera from the collection to embellish a couple of the hearts.


Here you can see how dimensional the page is!


I created an embellishment cluster to the right of the photo using more stickers and ephemera, as well as a cute little wooden button. I love all these pretty colours!


I used one of the die-cuts from the collection as the title for my layout. And I of course had to add foam tape underneath it, to give it some extra dimension! I seriously could not live without my foam tape! I finished the page off with a few lines of journaling.

Thanks so much for joining me on my blog today!

Wednesday 15 February 2017

Love You | Stuck?! Sketches February 15th challenge

Hello friends!

It's time to share the February 15th challenge at Stuck?! Sketches! I always love Laura's sketches,and this one is no exception! Let's take a look...

Image may contain: text

And here's my layout based on the sketch...


I documented a cute photo of our kitten. She loves it when I receive a delivery of scrapbooking stuff, because she likes to play with the box and the packaging! I thought she looked super cute in with the pink tissue paper!

I used the Cocoa Vanilla Studio 'Make a Wish' collection for this layout. Even though it's a birthday themed collection, there are plenty of non-themed items within the collection, which means that it's great for scrapping everyday photos as well.

Here are some closeups of my layout...


On the top left hand corner of the photo I created a little cluster that includes a Charms Creations Terrific Tab with a word sticker layered on top, and a cute little paper rose.


To the left of the photo I added some more embellishments from the 'Make a Wish' collection, including a chipboard arrow and a banner sticker.


I love using wood veneer on my pages, and this piece from the Cocoa Vanilla 'Love Always' collection was the perfect title for my page! Here you can also see the doily that I tucked behind my photo in place of the star on the sketch.

Lastly I added a few chipboard stars, and applied some texture paste through a star stencil onto my background. I finished the layout off with some typed journaling.

If you haven't done so already, I hope that you'll head on over to the Stuck?! Sketches blog and take a look at the fabulous layouts created by my fellow design team members! We'd love you to play along with us by creating a layout based on this sketch! Link up your layouts on the Stuck?! Sketches blog by February 28th to be in the running to win a prize from one of our very generous sponsors:

No automatic alt text available.

Image may contain: text

Thank you so much for visiting my blog and taking a look at my layout! Thank you to those who take the time to leave a comment as well - it is always very much appreciated!

Mandy

Shine Bright | Cocoa Vanilla Studio

Hi everyone!

I'm excited to be sharing my first project using the gorgeous new Wild at Heart collection from Cocoa Vanilla Studio. Everything about this collection is stunning!! The colours are amazing, with a mixture of both pastels and bolds. And the floral elements are just divine!! I'm totally crushing on it all!!

Here's the layout that I created.


I documented a photo of my eldest daughter taken on Christmas Day last year. Seeing this photo reminds me of how quickly she is growing up! She'll be a teenager this year, which is a bit scary, but I'm so proud of the beautiful young lady that she is becoming. This collection was just perfect for scrapping this lovely photo of her.

I started my layout off by cutting a large title out of my white cardstock using the Colour Me Happy Cut Files. I then backed it with the reverse side of the Luscious patterned paper. I think this may be my favourite patterned paper in the collection, with the beautiful florals on one side and the ombre watercolour pattern on the other! I love the look of this showing through the cut file!

Here are some closeups of my layout...


The florals on the Luscious patterned paper are perfect for fussy cutting! I created a pretty cluster to the left of my photo that includes some fussy cut florals as well as a die cut from the ephemera pack. I added foam tape underneath the flowers to give them varying heights and dimension.


On the bottom right hand corner of the photo, I added a wooden heart from the wood veneer pack with a banner sticker layered on top. I then tucked two flowers from the ephemera pack under the corner of the photo. How pretty are the blues teamed up with the dark pinks/reds!?!


I created a third cluster on the left hand side of the layout to balance out the first two, and to create a visual triangle. Here I used some more flowers from the ephemera pack (I can't get enough of these!!). I once again added foam tape underneath one, to give it some extra dimension. I popped a little die cut banner on top of the flowers to complete the cluster. Underneath this cluster I added a couple of tiny word strips from the sticker sheet. I usually add journaling to most of my layouts, but these were the perfect words and sentiment, so I didn't feel that I needed to add any additional journaling to this page.

I finished the page off by adding a couple more wood veneer hearts, some enamel dots, and a few gold ink splatters.

The Wild at Heart collection will be hitting retailers very soon, so keep your eye out, because you will not want to miss out on this collection!

Thanks so much for joining me on my blog today!

Mandy x

Sunday 12 February 2017

Smile | The Cut Shoppe

Hi everyone!

Today I'm up on the The Cut Shoppe blog sharing a fun layout using the new 'Be Mine' cut file set from The Cut Shoppe Etsy store!


I documented a photo of my eldest daughter and I when we went on a ferris wheel recently. I love that she's so good at taking selfies, because it means that I actually get in front of the camera with her more often rather than always being the one taking the photos. And I love that I have this photo of the two of us together to remember the fun that we had!

I used my stash of Felicity Jane papers and embellishments on this page, with a few Cocoa Vanilla die cuts thrown in as well.

This is the 'Be Mine' cut file that I used...

The Be Mine cut file set includes 5 love themed images, that can be used on your scrapbooking and papercrafting projects.

I was immediately drawn to the XO XO cut file, and knew that I wanted to enlarge it and make it the main feature of the page.


I cut it first from the spotty patterned paper, and then created an offset and cut it from the bright pink paper. This gives the cut file a nice border and helps it stand out from the background. I lightly glued it to my page, and then used my sewing machine to stitch through the middle of the XO's. I like the texture and interest that this adds.


I added some layers of patterned paper behind my photo and then popped some foam tape underneath to give the photo some extra height and dimension. I created a little cluster of die cuts and a paper bloom on the bottom left hand corner of the photo, and I also added my title across the bottom of the photo.


Up in the top right hand corner of the layout, I added some little fishtail banners, as well as a cute little die cut heart. I stitched through the banners to add some extra detail.


I created one final cluster in the bottom right hand corner of the page to balance out the first two. This one includes some more die cuts and another paper bloom, as well as a cute little heart puffy sticker.

I finished the page off with some typed journaling, and a sprinkling of gold sequins.

Thanks so much for joining me on my blog today! Why don't you pop on over to The Cut Shoppe etsy store to take a look at these cut files as well as all the new love/valentines themed ones that have recently been added.

Wednesday 1 February 2017

Loveliness | Stuck?! Sketches February 1st Challenge

Hello!

Here we are already a month into 2017! As always, the start of a new month means that it's time for a new challenge over at Stuck?! Sketches! Laura has designed the most gorgeous sketch for us to use...

No automatic alt text available.

Here's my take on the sketch...


I documented a couple of photos of my youngest daughter Eleanor with her cousin Phoebe. We don't get to see their family very often because they live in another state, but when they came down recently to visit, the girls had a lovely time playing together.

I used the Simple Stories 'Enchanted' collection on this layout.

Here are some closeups...


The embellishment cluster that I created to the left of the photos includes a couple of stickers from the Enchanted collection, as well as a Felicity Jane flair button. You can also see here the heart that I machine stitched behind the photos. This was in place of the star element on the sketch. I like the subtle detail that this adds.


I tucked a gorgeous Charms Creations DIY cloud underneath the top of the photo on the right hand side. I added a couple more stickers here, including a banner and a heart, to complete the cluster.


I added my title down in the bottom right hand corner of the layout as on the sketch. I used a Pinkfresh Studio foam glitter word sticker. It was the perfect title for this page featuring two sweet girls!

I completed the page by adding some journaling and a sprinkling of star sequins.

If you haven't done so already, I hope that you'll head on over to the Stuck?! Sketches blog and take a look at the fabulous layouts created by my fellow design team members! We'd love you to play along with us by creating a layout based on this sketch! Link up your layouts on the Stuck?! Sketches blog by February 28th to be in the running to win a prize from one of our very generous sponsors:

No automatic alt text available.

Image may contain: text

Thank you so much for visiting my blog and taking a look at my layout! Thank you to those who take the time to leave a comment as well - it is always very much appreciated!

Mandy

Forever & Always | Cocoa Vanilla Studio

Hi everyone!

I'm so thrilled to be sharing my first layout with you as part of the Cocoa Vanilla Studio Design Team!!

With Valentines' Day just around the corner, the design team are going to be sharing some gorgeous 'love' themed projects with you on the Cocoa Vanilla blog over the next couple of weeks. Here's my layout featuring the super beautiful 'Love Always' collection!


I documented a photo of my husband and I on our wedding day nearly 15 years ago! Looking back at photos of our wedding day brings back such happy memories, and I really enjoyed making this page!

The 'Love Always' collection is one of my favourites! I absolutely love the mixture of pastels teamed up with the bolder black and white patterns! And it's so perfect for documenting wedding photos!

I started my layout off by trimming about 1cm off the side of my white cardstock base so that I could add a strip of the Twin Set paper (reverse side) down the left hand side. I matted my photo with the Bouquet patterned paper (reverse side), and then I was ready to start embellishing!

Here are some closeups so that you can see all of the pretty details...


I tucked a frame from the chipboard sticker pack underneath the bottom left hand corner of the photo, as well as a flower that I cut on my Silhouette Cameo using cut files from the Colour Me Happy collection. I backed the flower with the Frolic and Note to Self patterned papers. To complete this cluster I added a vellum ampersand, and a wood veneer heart from the collection.


On the top right hand corner of the photo I added another flower that I cut using the same cut file set. I layered a banner on top that I fussy cut from the Lovely Things patterned paper, and lastly I added a chipboard sticker to the cluster. I love that there are so many gorgeous coordinating embellishments within the collection, which makes it super easy to create beautiful embellishment clusters!


I added one final embellishment cluster to the top right hand corner of the layout. You'll notice that the embellishment clusters are positioned diagonally down the page to help direct the viewer's eye towards the photo. I created a little fishtail banner using the Bouquet patterned paper and then layered the wood veneer banner on top. Lastly I added one of the gorgeous flair buttons from the collection.

I finished my layout off by adding a few little hearts from the die cut pack, as well as a couple of tiny word stickers from the sticker sheet.

If you have wedding photos that are waiting to be scrapped the 'Love Always' collection is absolute must!

Thank you so much for joining me on my blog today and taking a look at my layout!

Mandy x