
Hi friends!
Today I'm sharing a new entry in my Vicki Boutin junque journal! I’m so excited to be joining in with Vicki’s Junque Journal Summer Camp, and I used one of the June prompts to inspire this page. I chose prompt #6, which is to use the neutral art crayon pack. I must admit that this is probably my least used pack of art crayons, but you know what?! I loved playing with these colours, and I’ll definitely be using them more now! I’ll show you my finished pages, and then I’ll take you through my process step-by-step to show you how I created them.
These junque journal pages were all about experimentation for me… I had no plan when I started, I simply kept adding layer upon layer to my background until I was happy with how it looked! It was fun just to play and experiment with different ways of using the art crayons!
Here’s my process…
1) I started by scribbling the green crayon from the pack onto my craft mat, and then spritzing some water onto it to make a watercolour. I then used my brayer to apply it to my background.

2) Next I added some more colour to the background using the art crayons with a stencil brush. I used the same green again, and I also brought in some grey, and a little bit of the dark blue.

3) For the next layer, I mixed the Iridescent glaze with the dark blue art crayon, and applied it through one of the Vicki Boutin stencils in three areas on my background. I really love that you can mix the art crayons with the glazes, because it means that you can customise the glazes to whatever colour you want!

4) Once the glaze was dry, I then applied some more of the dark blue art crayon to the background, this time using the packaging (or kissing) technique. If you haven’t tried this before, all you need to do is scribble the art crayon onto some plastic packaging, add a little water to it, and then ‘kiss’ the packaging to the cardstock to apply the colour.

5) I also applied some more of the green art crayon using the same technique.

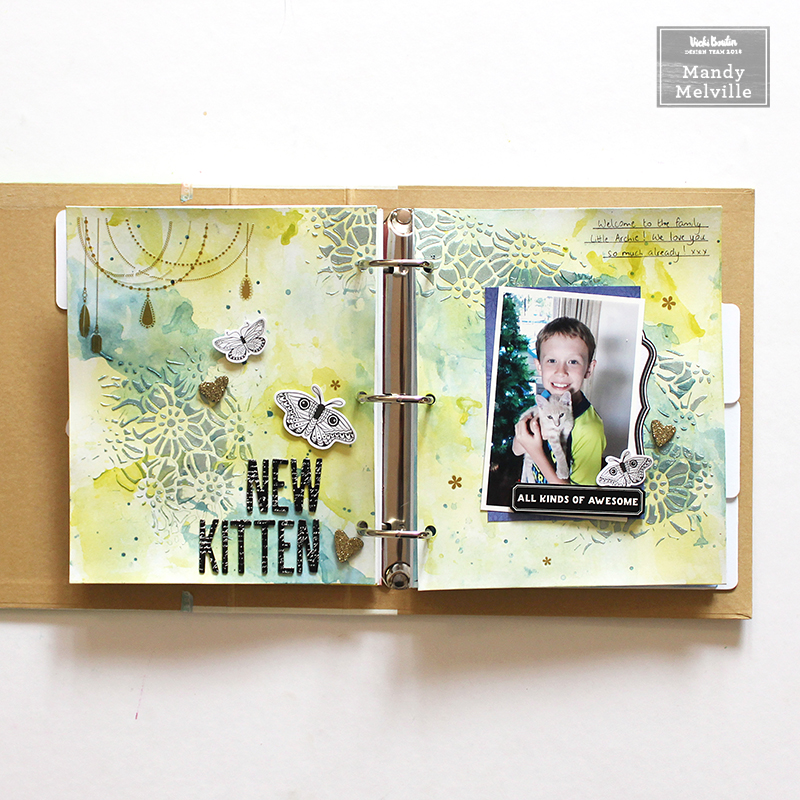
Here’s a look at the finished pages, before I added my photo and embellishing…

I started my embellishing by adding my title to the left hand page using the chipboard Thickers from the ‘All the Good Things’ collection. I also added a couple of butterflies from the watercolor sticker pack, and gold glitter hearts from the foam Thickers pack.

At the top of the page I added a beautiful gold rub-on from the collection. I love how this finishes it off!

I added a photo of my son with our new little kitten Archie over on the right hand page. I matted the photo with one of the patterned papers from the 7x10 inch paper pad, and I also tucked a label from the die cut frames pack under the right hand side.

I created a little cluster on the bottom right hand corner of the photo, using a cardstock sticker and another butterfly from the watercolor sticker pack. I also added another gold glitter heart to this page.

I added a few lines of journaling to the page, and then I was done! Here’ another look at the completed pages…

Thanks so much for joining me today! I’m looking forward to sharing some more Junque Journal pages with you this month for the Summer camp! Make sure you share your projects with us as well over in the Vicki Boutin Mixed Media Community Facebook group!
Supplies Used:
Junque Journal
Junque Journal Refills – White Paper
Gesso
Art Crayons #3 – Neutral
Creative FX Glaze – Iridescent
Stencils
Watercolor Brushes
Stencil Brush Set
Mister Bottles
Single-sided Card Pad 7”x10”
Cardstock Stickers
Thickers – Alpha/B&W Chipboard
Thickers – Phrase/Glitter Foam
Rub-Ons
Cardstock Die-Cuts – Frames
Watercolor Stickers

No comments:
Post a Comment